Hi friends, in the KlikPhotoshop tutorial this time, we will learn how to remove the green screen in Adobe Photoshop. Green Screen / Chroma Key is a green screen that is used in the process of taking pictures or videos. This green screen technique has been widely used, especially in filmmaking, news broadcasts, industry and video games.
With a green background, it is intended to make it easier for editors when doing the cropping or editing process of an object. Then, how to remove the green screen background in photoshop?, with us doing some commands and adjusting the adjustment layer, we can easily remove this green screen background in photoshop. Ok guys, let’s get started!, in this tutorial I will use Adobe Photoshop CC2015:

How to Remove Green Screen in Photoshop
Step 1Open the image file with the green screen background that you have prepared. With the keyboard shortcut
Ctrl+O (Win) /
Command+O (Mac) to open an image file in Photoshop. Here I will use the image of a man wearing glasses:

Color Range command . So to get to that, we go up to the
Select menu at the top of the screen and choose
Color Range from the list:

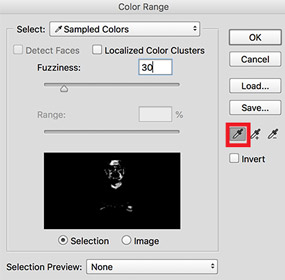
Step 3Then in the color range dialog box, use the
Eyedropper tool to select and target the green background. Then hold down the
Shift key on the keyboard, as we
drag or
click over the green area while adding more pixels to the selection color:
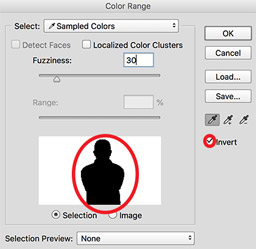
Invert at the bottom of the eyedropper to invert the selection to our object (photo) and not to the background. You can also see a quick preview of the selection, switch the
Selection option to the
Image option by changing the
Selection Preview from its default setting of
None to
Greyscale ,
Black ,
Matte White and
Masking , then click
ok to close the dialog box:
Step 4After we have successfully selected all the green backgrounds, then we go to the layers panel. Then click
the Add Layer Mask icon under the layers palette. Doing so, it will invert the selection removing the entire green background selection, and only leaving the photo on the canvas with a transparent background:

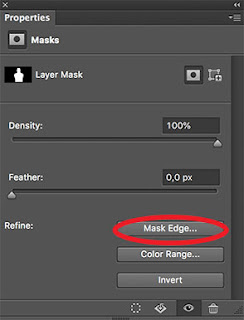
Step 5Next we are going to tidy up the edges of our image, for that we open the Layer Mask
Properties panel. If your properties panel doesn’t appear in the document window, you can open it by going to the
View menu at the top of the screen and selecting
Properties. Then in the Properties dialog box, we select
Mask Edge :
Then in the
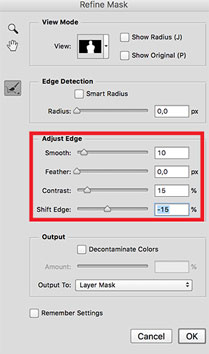
Refine Mask box, use the
Adjust Edge slider to remove the edges and refine the edges, adjusting the values as needed.
Smooth slider to soften jagged edges,
Contrast slider to sharpen and
Shift Edge slider to widen selection edges. Then click
Ok to close the dialog box:
Step 6Next we are going to smoothen and remove the edge of the halo on the layer mask by applying a photoshop filter. For that, go to the
Filter menu at the top of the screen select
Other , and select
Minimum again :
ALSO READ

Then in the Minimum dialog box , set the radius as needed. Because what we are working on is a human object / person, then keep the subject realistic in detail. Here I’ll set the
Radius to
1 pixels , I think it’s safe for my image case:

Step 7Next we remove the remaining green light around our image/photo area. If we look and look carefully, in the image there is still green light output left around the glasses on the object of my image:

The first thing we have to do is apply adjustments to our image. For that, we go to the layers panel, then click on
the Create New Adjustment Layers icon at the bottom of the layers palette. Then choose a
Hue/Saturation channel from the list that Photoshop displays:

Step 8This will then open up the Hue/Saturation dialog box. Then in the dialog box, click on the
drop-down menu default master , change the channel to
Greens . With us changing to the green channel, this will only affect the green color and not for the other layers of the object. Then
drag the
Saturation handle to remove the green color, or to expand the selected color. Then adjust the
Hue to set the right color whether it’s in the hair, face or whatever where the green sticks out, in my case it’s just the glasses:
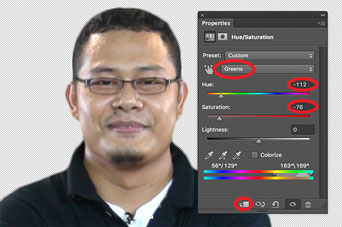
Now, by removing the remaining green in the image, we have succeeded in removing the green screen and perfecting it.
For the final option of this tutorial, you just need to add whatever background you want. Here I will add a mountain background below my image:

And, here’s the final result of this tutorial after we added a mountain background to replace the previous green screen. Ok friends, happy creating and trying out the amazing features of Adobe Photoshop:

Ok, friend, that’s the tutorial this time about how to remove the green screen in Adobe Photoshop. Thank you for visiting, I hope this is useful and see you again in another KlikPhotoshop tutorial.