Hi friends, in this tutorial we will learn how to make a ghost effect with photoshop on a photo to give it a more “ghost” appearance. By applying simple steps we can create this effect quickly and easily in Photoshop. Ok guys, in this tutorial I’m using Adobe Photoshop CS6 , and here are the results of this tutorial:
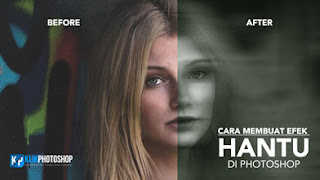
How to Create a Ghost Effect in Photoshop
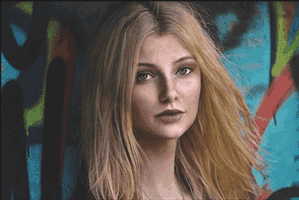
Step 1The first thing we do is open the image we want to use. Go to the
File menu at the top of the screen select
Open , or use the shortcut
Ctrl+O (Win) /
Command+ O (Mac) to open the image in Photoshop. In this tutorial I used an image I downloaded from
Pixabay :
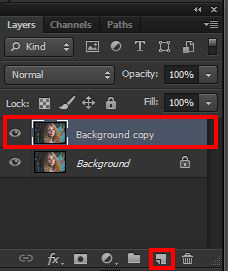
Step 2Next we go to the layers panel. Make a copy of the background layer, so that our original photo is still protected from things we don’t expect. For that, press
Ctrl+J (Win) /
Command+J (Mac) on the keyboard as the fastest shortcut to make a new copy in photoshop:
Then select the new copy layer to convert the image to
black and white. The quickest way to do that is to press
Ctrl+Shift+U (Win) /
Command+Shift+U (Mac) on the keyboard as a shortcut. Or we go to
Image at the top of the screen, select
Adjustments, then select
Desaturate. Doing so will allow Photoshop to automatically convert our image to black and white on the canvas:

Step 3Here I’m going to name the first copy layer “desaturate”. Next I’ll duplicate the desaturate layer once again in the layers panel. With the keyboard shortcut
Ctrl+J (Win) /
Command+J (Mac)
:

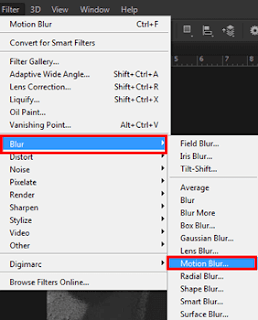
Step 4Then on the selected “Desaturate” layer, we make the image a bit blurry. To do that, we go up to the
Filter menu at the top of the screen, choose
Blur , then choose
Motion Blur again :
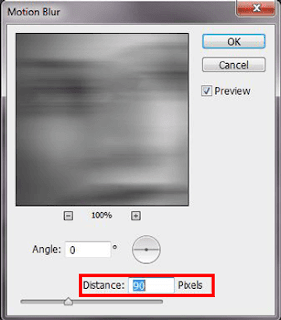
Next in the Motion Blur dialog box , set the distance to
90 pixels (until you get a slightly blurred image) as needed, and keep the
Angle at 0:
Well, this is how my image looks after applying the
Motion Blur Filter effect :

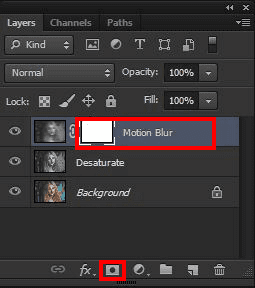
Step 5In the layers panel I will name this layer “motion blur” in the layers palette. Then with the
“Motion Blur” layer selected, click the
Add Layer Mask icon at the bottom of the Layers panel:
Then select the
Brush Tool (B) from the toolbox, then press the letter
D on the keyboard to make sure that we choose black as the foreground color. Then we go to the
Brush options bar at the top of the document window to set the
Opacity value as needed:

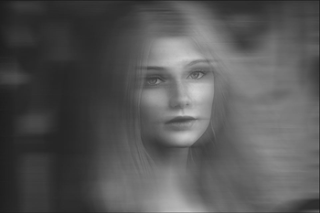
With a black, soft-edged brush as the foreground, start painting the center of the face in gradual motions to bring back the eyes, nose and mouth, blurring the rest. Make sure to stay within the boundaries of the face so everything is well blurred at the center:
Step 6Next we merge all the layers in the layers palette. With the keyboard shortcut
Shift+Ctrl+Alt+E (Win) /
Shift+Command+Option+E (Mac):
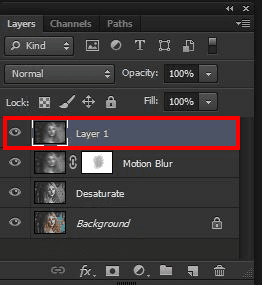
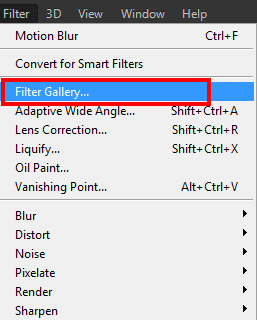
With the “merged” layer selected, we go to the
Filter menu at the top of the screen and choose
Filter Gallery :
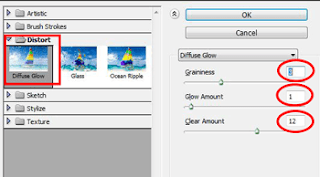
In the dialog box select
Distort , then set it to
Diffuse Glow. Then set the
Graininess to
3 ,
Glow Amount to
1 and
Clear Amount to
12 . This value can be in different cases, according to the image you use:
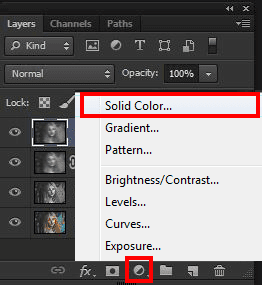
Step 7In the final step, add colors as desired. For that, with the “merge” layer selected, we click the
Adjustment Layer icon at the bottom of the layers panel and select
Solid Color :
Then in the Color Picker dialog box , choose the color you want. Here I chose a
Dark Green color for my image:

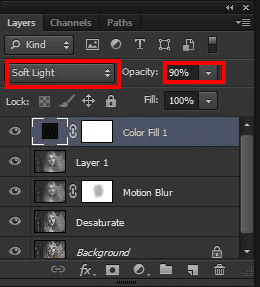
After that we go to the layers panel, change the default layer mode
Normal to
Soft Light, and lower the
Opacity value to around
90%:
With that we have successfully created a ghost effect in photoshop, and this is the final result of this tutorial. Hope you guys enjoyed this tutorial and don’t hesitate to play around with these great Photoshop features, have fun creating:

Ok friends, that’s the tutorial this time about how to make a ghost effect with Photoshop. Thank you for visiting, I hope this is useful and see you again in another KlikPhotoshop tutorial. Thanks.